Dog Grooming Sequence Planner
Follow this step-by-step guide to ensure a stress-free grooming session. Click each step to mark it complete and track your progress.
🔍 Step 1: Inspection & Brush-Out
Visual inspection for ticks/cuts. Dry brushing with slicker brush and steel comb. Remove mats before bathing.
✂️ Step 2: Nail Trimming
Trim nails while dog is calm. Use guillotine clippers for small breeds, scissor-style for large. Avoid the quick.
👂 Step 3: Ear Cleaning
Clean ears before bathing to prevent pushing debris deeper. Use vet-approved cleaner. No cotton swabs inside canal.
🛁 Step 4: Bathing
Use lukewarm water. Thoroughly wet coat before shampoo. Rinse completely to prevent itching. Towel dry gently.
💨 Step 5: Drying & Final Brushing
Dry thoroughly to prevent hot spots. Use high-velocity dryer or cool setting. Brush until bone-dry to catch missed tangles.
✂️ Step 6: Trimming & Styling
Trim sanitary areas, paw pads, and feathering. Use thinning shears to blend. Start with body, then legs, finish with head.
🎉 Step 7: Final Touches & Rewards
Final brush to remove loose hairs. Check ears for water. Apply pet-safe cologne if desired. Give treats and praise!
Essential Tools Checklist
Picture this: you’ve got your clippers ready, the shampoo is poured, and your dog is sitting patiently. You start shaving the legs because that’s the easiest part to reach. Suddenly, you realize there’s a massive mat tangled in the tail fur that you can’t get to without moving the body first. Or worse, you bathe the dog, only to find out that wetting those tight mats has pulled every hair root possible, causing pain and skin irritation. It happens to the best of us. But it doesn’t have to.
The secret to a stress-free grooming session isn’t just having the right tools; it’s about the sequence. Doing things in the wrong order can turn a quick maintenance trim into a two-hour battle with knots, anxiety, and muddy floors. When you follow a logical flow, you work with your dog’s natural movements rather than against them. This guide breaks down the exact order you should groom a dog, ensuring safety, efficiency, and a happy pup at the end.
Why Sequence Matters More Than Tools
You might think that buying expensive shears or high-end brushes makes all the difference. While quality tools help, they are useless if you use them in the wrong order. The primary reason for a specific sequence is mat prevention. Mats tighten when wet. If you bathe a dog before fully detangling, you are essentially cementing knots into the skin. This causes pulling, pain, and often requires shaving off large sections of fur that could have been saved.
Secondly, consider the dog’s energy levels. A fresh dog is more cooperative. If you leave the most stressful part-like nail trimming or ear cleaning-for last, your dog may be exhausted, agitated, or simply done with the process. By structuring the session from least invasive to most sensitive, you build trust. Your dog learns that the scary clipper noise comes after the gentle brushing, making them more likely to tolerate it next time.
Finally, cleanliness plays a role. If you cut nails first, you risk cutting dirty nails or getting dirt under the pads during the rest of the process. If you clean ears last, debris falls onto the freshly brushed coat. The order ensures that each step builds on the previous one without undoing the work you’ve already done.
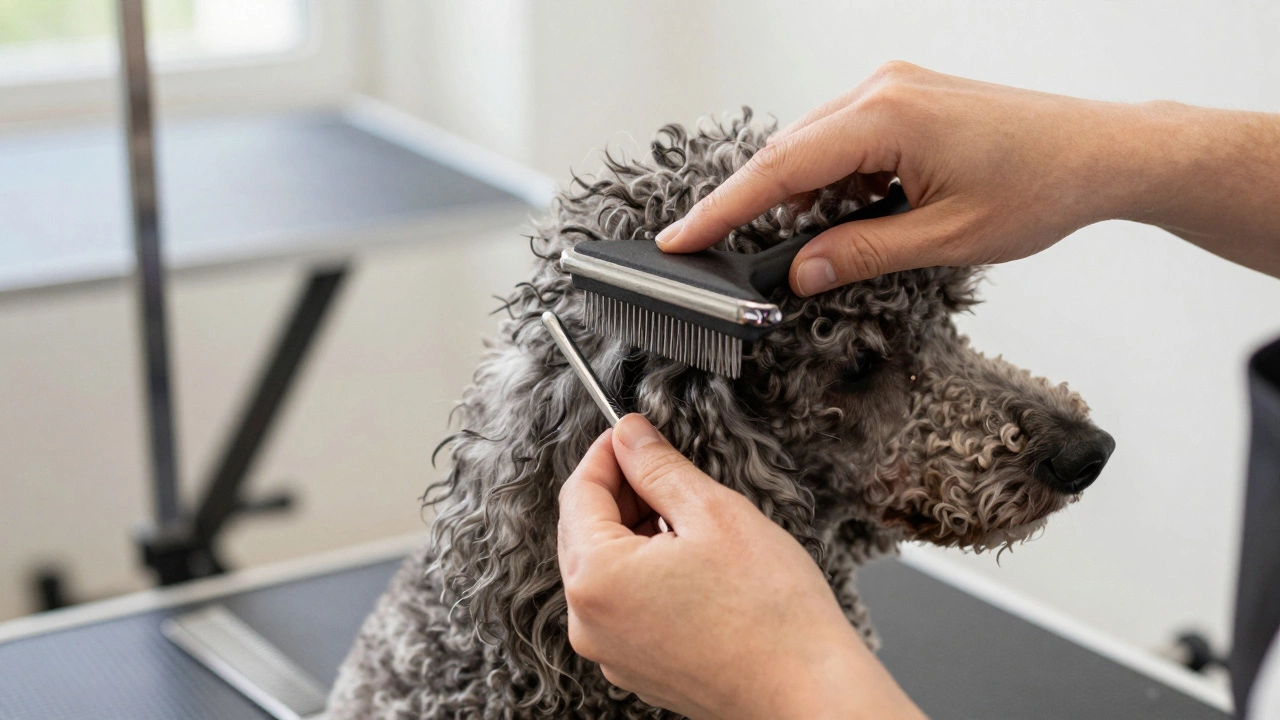
Step 1: The Initial Inspection and Brush-Out
Before you even touch a brush, do a visual inspection. Look for ticks, cuts, rashes, or swollen areas. This is also the time to check the ears for odor or discharge. Once you confirm your dog is healthy, begin with dry brushing. This is the most critical step for long-haired breeds like Poodles, Standard Poodle, known for their dense, curly coats that trap debris easily.
Use a slicker brush followed by a metal comb. The slicker removes loose topcoat, while the comb checks for hidden mats close to the skin. Work in small sections. Lift the hair and comb through from the tip to the root. If you hit resistance, stop. Do not force it. Use your fingers to gently separate the knot or use a dematting spray designed for dry coats. Forcing a brush through a mat causes 'brush burn' and micro-tears in the skin.
- Tools needed: Slicker brush, steel comb, dematting spray (optional).
- Focus areas: Behind the ears, under the armpits, inside the leg creases, and around the collar area.
- Time estimate: 15-30 minutes depending on coat length.
If you find severe mats that cannot be combed out, you must shave them out now, before bathing. Wet mats are impossible to remove safely with scissors alone due to the risk of slipping and cutting the skin.
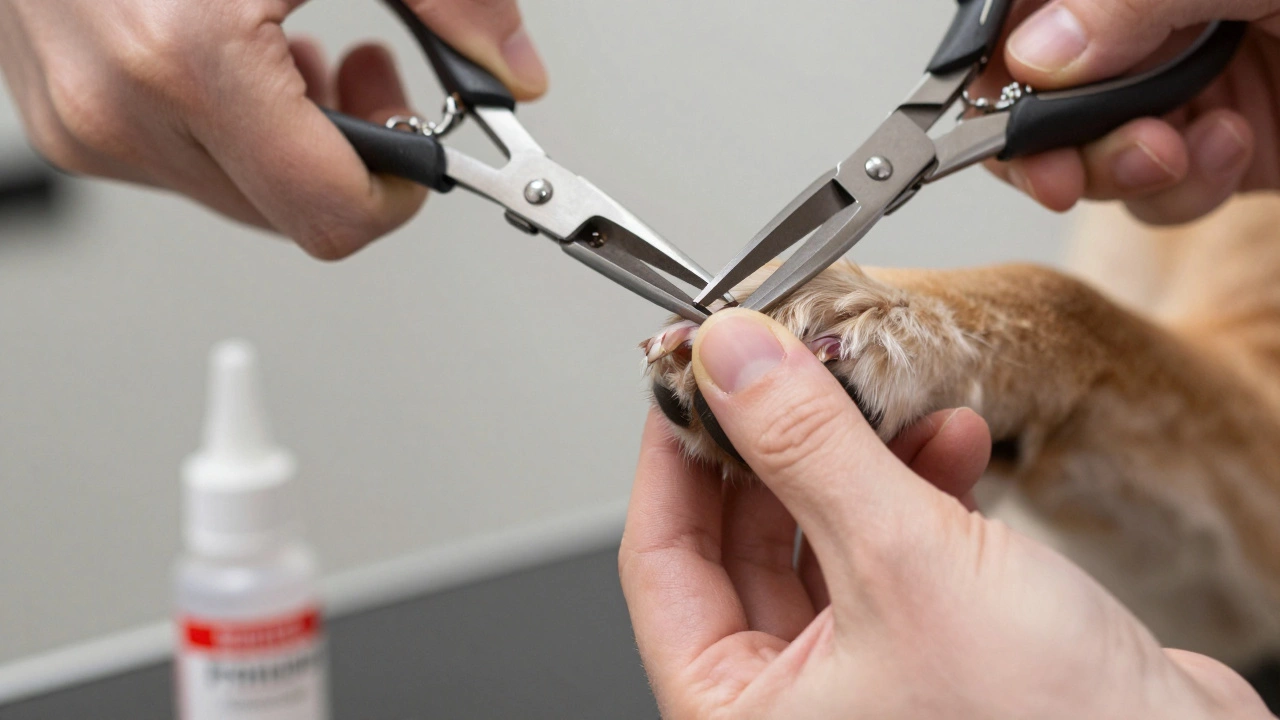
Step 2: Nail Trimming
Trimming nails is often the most dreaded part of grooming for both owner and dog. Doing it early, while the dog is still calm from the brushing phase, is strategic. Also, shorter nails prevent the dog from scratching you if they become anxious later in the session. Long nails can also splay the feet, changing the angle of the leg and making clipping harder.
Hold the paw firmly but gently. Avoid pressing on the toes. Use guillotine clippers for small dogs and scissor-style clippers for larger breeds with thick nails. Cut small amounts at a time. Look for the 'quick,' the pink vascular tissue inside the nail. In clear nails, it’s visible. In dark nails, look for the black dot in the center of the cross-section as you cut. Stop before you see it. If you accidentally nick the quick, apply styptic powder immediately to stop bleeding.
| Breed Type | Nail Characteristics | Recommended Tool |
|---|---|---|
| Small Breeds (e.g., Chihuahua) | Fine, brittle, fast-growing | G Guillotine Clippers |
| Large Breeds (e.g., German Shepherd) | Thick, hard, slow-growing | Scissor Clippers |
| Senior Dogs | Brittle, prone to splitting | Dremel Grinder |
For dogs who hate clippers, consider using a Dremel tool to grind the nails down gradually. It creates less pressure and allows you to control the depth better. Always reward your dog heavily after each paw is done.
Step 3: Ear Cleaning
Now that the nails are done, move to the ears. This step comes before bathing because water can push debris deeper into the ear canal if it hasn’t been loosened first. Dirty ears are a breeding ground for bacteria and yeast, leading to infections.
Use a veterinarian-approved ear cleaner. Never use cotton swabs (Q-tips) inside the ear canal-they push wax further in and can damage the eardrum. Instead, pour the solution into the ear, massage the base of the ear for 30 seconds to loosen wax, and let the dog shake its head. Then, wipe away the loose debris from the outer ear flap with a soft cloth or cotton ball.
Check for redness, swelling, or a foul smell. If you notice any of these, stop grooming and consult a vet. Grooming an infected ear will cause significant pain and worsen the condition. For breeds with hairy ears, like Cocker Spaniels, a breed known for excessive hair growth in the ear canal that traps moisture and debris., pluck or trim the excess hair carefully to improve airflow.
Step 4: Bathing
With the coat detangled, nails trimmed, and ears cleaned, it’s time for the bath. Use lukewarm water-not hot. Hot water strips natural oils from the skin, leading to dryness and itching. Wet the coat thoroughly before applying shampoo. Ensure the water penetrates to the skin, especially in double-coated breeds like Huskies or Golden Retrievers.
Choose a shampoo appropriate for your dog’s skin type. Hypoallergenic shampoos are best for sensitive skin, while oatmeal-based formulas soothe itchiness. Lather well, massaging the skin to promote circulation. Pay attention to the belly, groin, and paws, where dirt accumulates. Rinse completely. Residual shampoo is a common cause of post-bath itching and dermatitis.
After rinsing, apply conditioner if needed. Leave it on for the recommended time, then rinse again. Towel dry your dog gently, squeezing out excess water rather than rubbing vigorously, which can tangle the fur.
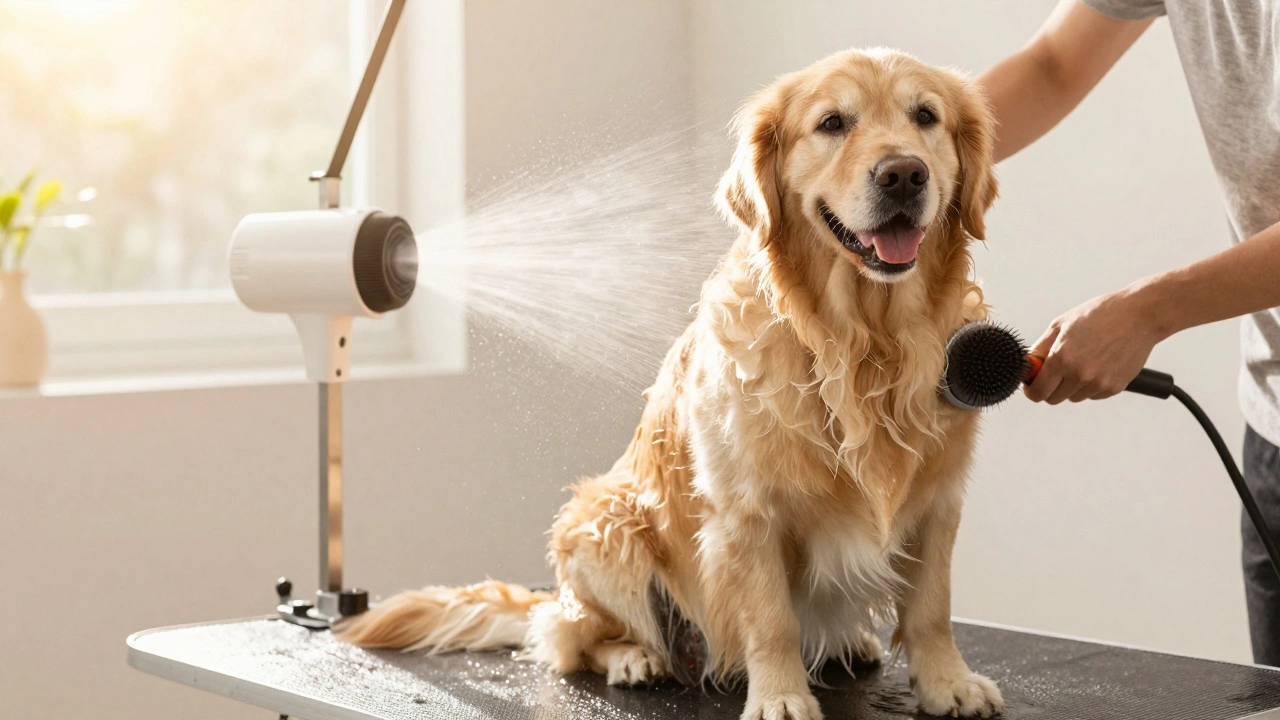
Step 5: Drying and Final Brushing
Never skip drying. A damp coat leads to hot spots, fungal infections, and odors. Use a high-velocity dryer to blow the water out of the undercoat while simultaneously brushing. This technique, called 'blow-drying,' helps straighten the hair and prevents new mats from forming as the coat dries.
If you don’t have a professional dryer, use a regular hair dryer on a cool setting and keep it at a safe distance to avoid burning the skin. Continue brushing until the coat is completely bone-dry. This is the second chance to catch any missed tangles. The friction from the dryer helps lift loose hairs, making them easier to remove.
Step 6: Trimming and Styling
Once the coat is dry and fluffy, you can see the true shape of the haircut. Now is the time to trim sanitary areas (around the genitals and anus), paw pads (to prevent slipping on smooth floors), and feathering (long hair between toes). Use thinning shears to blend lines and reduce bulk without creating harsh edges.
For face trims, use blunt-tipped scissors to protect the eyes and nose. Trim the hair around the eyes slightly to prevent irritation from stray hairs. If you’re doing a full clip, follow the direction of hair growth. Start with the body, then move to the legs, and finish with the head and neck. This ensures symmetry and balance.
Step 7: Final Touches and Rewards
Brush the coat one last time to remove any loose hairs from clipping. Apply a light coat of cologne or deodorizing spray if desired, but ensure it’s pet-safe. Check the ears one more time to ensure no water entered during the bath. Finally, give your dog a big reward. Treats, praise, and playtime reinforce the positive association with grooming. End the session on a high note so your dog looks forward to the next one.
Can I bathe my dog before brushing?
No, you should never bathe a dog before brushing. Wetting matted fur tightens the knots against the skin, making them painful and nearly impossible to remove without shaving. Always detangle the coat completely while it is dry before applying any water.
How often should I groom my dog?
Grooming frequency depends on the breed and coat type. Long-haired breeds like Poodles require brushing daily and professional grooming every 4-6 weeks. Short-haired breeds like Beagles may only need brushing once a week and bathing every 2-3 months. Regular maintenance prevents mats and keeps the skin healthy.
Grooming frequency depends on the breed and coat type. Long-haired breeds like Poodles require brushing daily and professional grooming every 4-6 weeks. Short-haired breeds like Beagles may only need brushing once a week and bathing every 2-3 months. Regular maintenance prevents mats and keeps the skin healthy.
What if my dog hates being groomed?
If your dog is highly anxious, break the process into smaller sessions. Spend one day just brushing, another day trimming nails, and so on. Use positive reinforcement with treats and praise. For severely fearful dogs, consult a professional groomer who specializes in fear-free techniques or consider mobile grooming services where the environment is quieter.
If your dog is highly anxious, break the process into smaller sessions. Spend one day just brushing, another day trimming nails, and so on. Use positive reinforcement with treats and praise. For severely fearful dogs, consult a professional groomer who specializes in fear-free techniques or consider mobile grooming services where the environment is quieter.
Do I need professional tools to groom at home?
You don’t need expensive equipment to start, but basic quality tools make a difference. A good slicker brush, steel comb, and sharp clippers are essential. Professional dryers save time but are not mandatory. Invest in tools that fit your hand comfortably and are appropriate for your dog’s size and coat type.
You don’t need expensive equipment to start, but basic quality tools make a difference. A good slicker brush, steel comb, and sharp clippers are essential. Professional dryers save time but are not mandatory. Invest in tools that fit your hand comfortably and are appropriate for your dog’s size and coat type.
Is it safe to trim my dog's nails myself?
Yes, it is safe if you take your time and use the right tools. Learn to identify the quick in your dog’s nails. Cut small amounts frequently rather than large chunks occasionally. If you accidentally cut the quick, remain calm and apply styptic powder. With practice, you’ll gain confidence and your dog will become more comfortable with the process.
Yes, it is safe if you take your time and use the right tools. Learn to identify the quick in your dog’s nails. Cut small amounts frequently rather than large chunks occasionally. If you accidentally cut the quick, remain calm and apply styptic powder. With practice, you’ll gain confidence and your dog will become more comfortable with the process.